Wednesday, June 30, 2010

Flutterby Inspiration...

To view the image up-close, please click on the photo.

Over these past few weeks, I have been inspired by the astounding creativity all around me. The amount of collective talent held by the Gallery Idol 2010 finalists has spurred my own creative mojo to kick into overdrive. From the wonderful comments left on my card posts, I've been able to discover the beautiful work of other paper-crafters from all around the world. For our final round, the challenge was to be inspired by a photograph. So for this card, I thought I'd let myself find inspiration in the work of others.
The fabulous Julee Tilman posted this gorgeous card on her blog today. I love it's clean lines and I wanted to try to capture some of her simple sweetness. The amazing Lynn Ghahary (Gallery Idol Top 10 Finalist and now a crafty friend of mine!) astounded me with this wonderful ribbon card in which she wove ribbon in a creative way. I wanted to try the weave effect and thought I could combine these two lovely cards into one of my own.
I began with this week's Color Throwdown colors and wove turquoise and cream card stock together before die-cutting a pretty butterfly, twice, from the woven panel. I have fallen in love with making my own cabbage ribbon, and I did it again here with some pretty chocolate organza ribbon. (Edit--Bean Tip: To make the ribbon, simply sew along the middle of your ribbon then pull it down along the thread.) Finally, when selecting my sentiment, I chose to make this a thank you card to show my appreciation for the other paper-crafters that inspire me every day.

If you'd like to see my Inspired by card for Gallery Idol 2010, feel free to visit this post

BEAN NOTES: (Unless otherwise noted, all materials are Stampin' Up) All Year Cheer (Sentiment) Stamp; Close to Cocoa Classic Dye Ink; Very Vanilla, Chocolate Chip, and Tempting Turquoise Card Stock; Top Note and Beautiful Butterfly Bigz Die; Big Shot; Fiskars Paper Crimper; Needle & Thread
HAPPY BEANS: Kate's Paperie Brown Organza Ribbon

Tuesday, June 29, 2010

The Happiest of Birthdays...

If you can indulge me, I'd just like to take a moment to muse on the response to my Gallery Idol 2010: Inspired by card. I truly appreciate the love left by my friends and family, but I'm equally astounded by the flattering comments being left by people who have never seen my work before this competition. This community of paper-crafters is unmatched for its kindness. Now on to the card details...

My wonderful Aunt Karen is celebrating her birthday next week, and I wanted to make her a nice card. She's also going to be a grandmom in November, so I know this year is going to be extra special. Karen is what our friends across the pond would call a "brick" as she is always willing to try anything at least once! I'm trying really hard to go a little more outside my comfort zone to create cards that are more vintage, to experiment with distressing, and try new techniques. I really admire cards like this and I'd love to expand my abilities. When I saw the Tuesday Trigger photograph on Moxie Fab, I knew I had a chance to do something new!
For this card, I used the lovely Jen del Muro's SFYTT Sketch. I had the lucky opportunity last year of being a guest designer for Jen, and I'm glad to be able to play again. I was really kind of just starting out with card-making then, and Jen gave me the confidence to keep going. I love the Trigger colors and had to go through my whole stash to find something that I was happy with. That blue is what I think of as cerulean and it's so beautiful that I wanted to match it as closely as I could.
I began with making some paper roses. I've never really done this before, and I found a wonderful tutorial here. I did mix it up a bit by employing the faux suede technique (see sidebar) and sponged the cream rose to match the Trigger. I then die-cut some pretty lined paper and adhered the roses to it.
I really love the idea of cabbage ribbon, but I don't have any. I decided to try making my own, and I was pleased with the results. I used some gold organza and stitched across the middle before pulling the ribbon along the thread. Next, I used distress ink on the background paper I found, mimicking the cool background of the photo.
Sometimes it's hard to try something new, but, like my aunt...you've got to do it at least once!
BEAN NOTES: Stampin' Up More Mustard and Rose Red Classic Dye Ink; Tim Holtz Broken China and Wild Honey Distress Ink; Making Memories Designer Paper; Pink Paislee Think Big and Believe Designer Paper; SU Pale Plum, Pretty in Pink, More Mustard and Very Vanilla Card Stock; Adirondack Stream Dimensional Pearls; Freebooter Script Font (fontspace.com); Spellbinders Nestabilities; Big Shot; Foam Tape
HAPPY BEANS: True Gold Organza Ribbon (generic); Embossing Thread & Needle


A Happy 4th...


 To view the image up-close, please click on the photo.

Oh my, I woke up and realized that July 4th is this very weekend, and I hadn't made a single card! Granted, I've been a wee bit busy with Gallery Idol 2010 (thank you, thank you, thank you to everyone who has voted!) But, Independence Day is upon us, and I thought I'd better get cracking!
For my card, I started with this week's fabulous sketch from Taylor's Cupcake Challenge. Also, Julee Tilman is hosting a star challenge, and what could be more perfect for 4th of July? I hemmed and hawed a little over whether to go traditional, and my decision was made when I saw the Curtain Call Challenge colors.
Since it's technically the birthday of our nation, I went with this adorable little cupcake, which I colored and paper-pieced in what else? Red, white and blue. To give him a little patriotic vim, I added a fun little top hat set at a rakish angle. I decided to set him up in the air, carried away by some starry balloons to celebrate this happiest of fourths!
BEAN NOTES: Taylored Expressions Beach Bum Stamp, Verve Seeing Stars Stamps, and Stampendous Patriotic Pair Stamps; Memento Tuxedo Black Ink; Papertrey Ink Fresh Snow Ink; Reminisce Designer Paper; Stampin' Up Whisper White, Real Red and Night of Navy Card Stock; Papertrey Ink Kraft Card Stock; SU Circle Punches; Papertrey Ink Clouds Die; Big Shot; Foam Tape
HAPPY BEANS: Copic Sketch Markers

Monday, June 28, 2010

You're the Pick of the Patch...Gallery Idol FINAL Round


To view an image up-close, please click on the photo.

Today is the first day of voting for the Final Round of Gallery Idol 2010. It has been an incredible journey and a sincere honor to have had this chance to compete. The caliber of talent in the Top 5 is astonishing, and I can say that the best part of this experience has been getting to know some amazing paper-crafters. A heartfelt thank you to everyone who voted me in the final five and for all the love and support! Also, thank you to Kelly Smith at Paper Crafts magazine for making this so much fun.

If you would like to vote, please feel free to use the voting widget in my sidebar or click HERE.

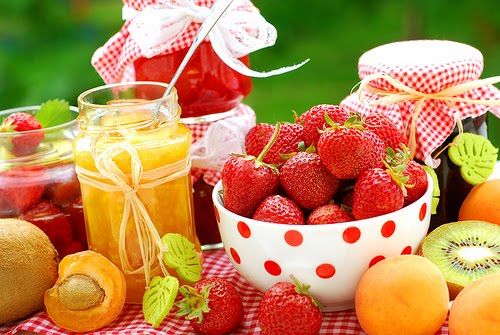
This round's theme was an "Inspired by" challenge, based on this photo:


We moved to Manhattan from St. Paul, Minnesota just a few months ago, so the inspiration photo actually got me thinking about berry picking in the Mid-West. The fruit is luscious, the farms are beautiful, and I was inspired by the photograph to create a card celebrating the happy fun of this summer pastime. I had to work quickly, with again only 3 days to create, and I hope you like the "fruit" of my efforts.

To begin, I sketched out the general idea of my card. Whenever I have something more complicated to do, I love to draw it out on graph paper, which really helps with dimensions and perspective. I decided to tackle the tractor first.
I traced out a pattern with a the aid of a light table and used it to cut out the various pieces of the tractor, beginning with a chipboard base, followed by two shade of green card stock. To add some depth, I sponged ink around each element. For more dimension, I double-traced and cut extra pieces of some of the parts. I wanted the tractor to shine like metal, so I applied glassy glaze to the darker green pieces. The wheels were carefully die-cut and circle punched, with a lot of trial-and-error to get the size correct. Tiny silver circles served as my "nuts and bolts."
Setting the tractor aside, I tackled the wagon by running some yellow card stock through my Big Shot with a woodgrain embossing plate. Then, I cut a multitude of "wood" slats, trimming and adhering on a piece of acetate. I did this process twice, as I needed to create an actual bed for my big ripe strawberry. A metallic pen helped make tiny nails in the wood. The wooden wheels were tricky, as after die-cutting and trimming the card stock, the spokes were very thin, and I adhered them to acetate for stability.


The banner is printed on canvas with a printer, which required some experimentation. I wanted to incorporate the polka dots on the bowl of strawberries and did so here, fading them out in order for the sentiment to shine through. I then cut it out and tied it to the wagon with very thin strips of raffia.

The little farmer dog was my next task, and I knew it would be difficult because of the size. He's only a bit over an inch high, and I wanted to paper-piece him. I again drew a template and worked with very sharp scissors to cut the elements, some several times to pop out specific parts. Like the inspiration photo, the playful pup is decked out in a gingham neckerchief (created from ribbon) and his hat is made from raffia. I sponged his edges for a bit more depth.

Next up was the real "fruit" of my labors: the big, ripe strawberry. I drew a template for both the fruit and the green cap and then traced and cut each out several times. I sponged around the edges again and then added liquid pearl "seeds." I assembled the strawberry to open like a traditional card for a place to write a message.
I was finally ready to assemble my entire card, which I did so by creating a "hitch" between the tractor and wagon and then by tracing and cutting an acetate card base. This card stands, with or without the big strawberry, all on its own. When I was done, I heaved a big sigh of relief, with just a little wish that it were a big breath of fresh country air.
BEAN NOTES: Stampin' Up Soft Suede, Riding Hood Red, Wild Wasabi, and So Saffron Classic Die Ink; VersaMark Clear Ink; SU Riding Hood Red, Whisper White, Basic Black, and Soft Suede Card Stock; Essentials by Ellen Hutson Chipboard; Taylored Expression Textured Cardstock (greens); Papertrey Ink Summer Sunrise Card Stock; Clear Acetate (generic); Copic Sketch and Multiliner SP Markers; Spellbinders Classic Circle Nestabilities; SU Circle Punches and Punch Pack; Big Shot; Hole Punch (generic); Printable Canvas (generic); Dafont.com Nashville Font, Foam Tape HAPPY BEANS: PTI Woodgrain Impression Plate; Lemon Yellow Liquid Pearls; Hero Arts Sponge; SU Glassy Glaze Embossing Powder; Kate's Paperie Gingham Ribbon; Raffia
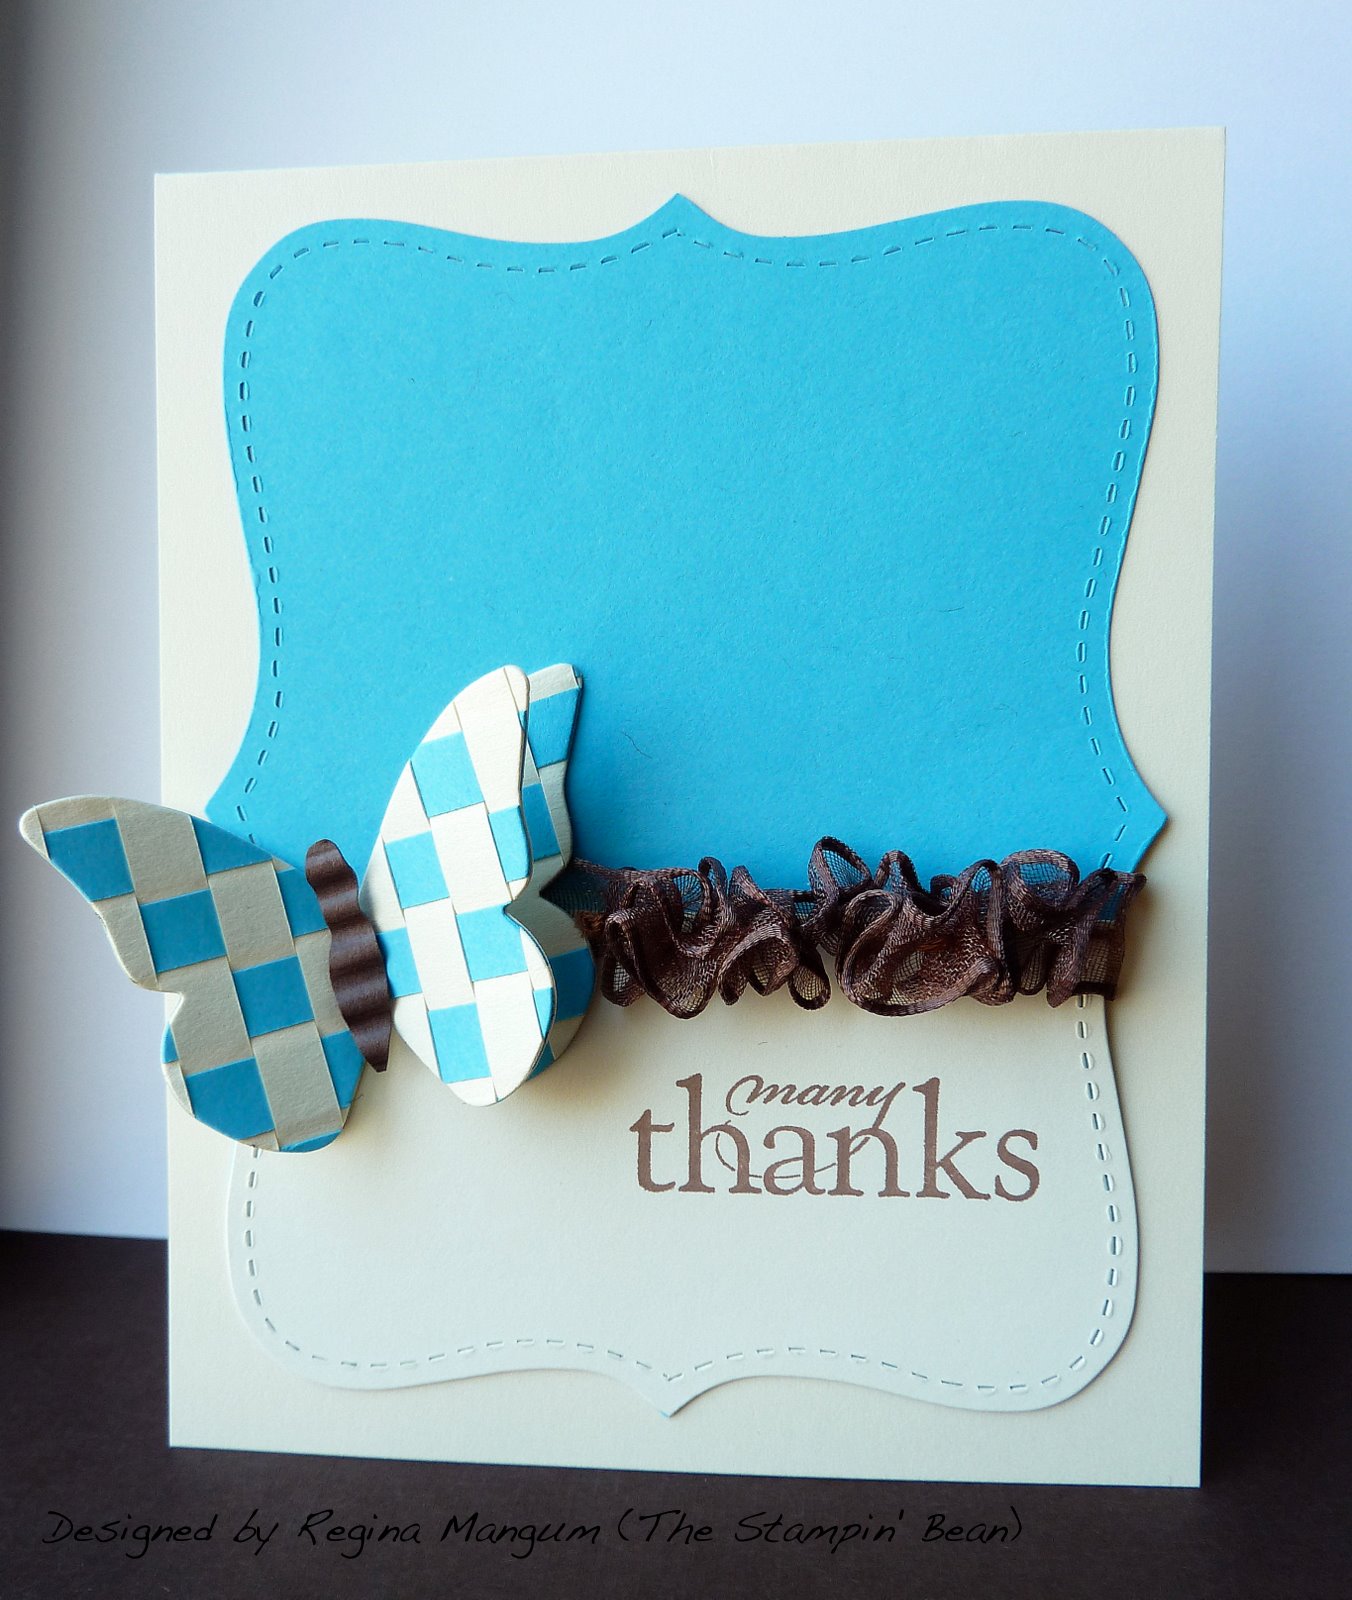


Friday, June 25, 2010

Cre*ate...


To view the image up-close, please click on the photo.

It's another Friday, which meant a long night of waiting and wondering whether or not I would make it to the next round of Gallery Idol 2010. The good news is that I am in the Top 5 Final Round! A huge THANK YOU to everyone who voted for me and left me such terrific comments. It's been a whirlwind ride and I'm so happy to be a part of something that has turned out to be an incredibly special experience.
So, in thinking about all the happy mojo that has been flowing among the talented papercrafters of the competition, I thought I would make a card celebrating what we do, and that is: create. Whether we are primarily card-makers or scrapbookers, we all make something with our hands to brighten someone's day or preserve a precious memory.
For today's card, I was inspired by the Tuesday Trigger over on Moxie Fab. The cute little halter top is bright and fun and a terrific color combination. I also used the sketch by the inimitable Margaret Moody from the Pals Paper Arts Challenge. To get started, I die-cut flowers reminiscent of the blooms on the halter top, drew in the centers and stripes with glitter and metallic pens and then adhered them to some black card stock. Next, I cut strips of yellow and silver card stock and glued those to my base, adding a pretty ruffled red ribbon. I found the perfect sentiment for how I was feeling, something to "define" what it is we papercrafters do, which is to imagine, to inspire, and to put a little gift of ourselves into everything we create.

Join me on Monday, June 28 for my fifth and final card for Gallery Idol 2010. The theme for this round is an Inspired by photo challenge using this photo! Best of luck to the Top 5, who have are not only worthy competitors, but also my friends.

BEAN NOTES: Stampin' Up Define Your Life Stamp; Memento Tuxedo Black Ink; SU Summer Sun, Real Red, and Whisper White Card Stock; Silver Metallic Card Stock (generic); Silver Metallic Pen (generic); Sakura Red and Clear Star Gelly Pens; SU Sizzix Birds & Blossoms Sizzlits; Big Shot; Black Brads (generic); Foam Tape HAPPY BEANS: Papertrey Ink Pure Poppy Stitched Grosgrain Ribbon

Wednesday, June 23, 2010

Lemony Goodness...


To view the image up-close, please click on the photo.


I was thinking happy thoughts, so I thought I'd try to make a card that might encourage someone else to do the same. I started off with the wonderful sketch by the amazing Kim Hughes for PaperCrafts Magazine's Go-to Sketch Challenge #4. As soon as I saw the sketch, I thought of a big fat mason jar filled with...something! So I looked through my stash of stamps and found these fun lemon slices and wedges. It's a billion degrees outside, so it seemed like a nice way to cool off and refresh myself. The lovely gals over at Stamp TV are hosting a pastel color challenge, and I knew I was headed in the right direction.
I began by sketching a template for my jar on scratch paper, which I used to cut out on acetate and pale yellow card stock. I used a metallic silver marker to outline the sides of the jar. Next, I stamped a lot of lemon wedges and slices on the same yellow and shaded them with Copics. After cutting each out, I adhered them in a mix-y pattern, I attached the acetate "jar" and then cut out the lid on gray card stock, outlining and drawing in lines with the same marker. I replaced the scalloped element of the sketch with a fun ruffled ribbon.
Next, I printed out my sentiment and die cut a frame, edging it in some liquid pearls. After dry-embossing the vertical element, I attached it to the jar with some Scor-Tape. Now I had a nice jar of sunshine to send to someone who could use some!
BEAN NOTES: Flourishes Lemons Life & Love Stamps; Stampin' Up Crushed Curry Classic Die Ink; Papertrey Ink Lemon Tart Card Stock; SU Baja Breeze, Whisper White, and Groovy Guava Card Stock; Copic Sketch Markers; Cuttlebug Swiss Dots Embossing Folder; Big Shot; Spellbinders Classic Circle and Classic Scallop Circle Nestabilities; SU Baja Breeze Grosgrain Ribbon; Foam Tape; Lemon Yellow Liquid Pearls HAPPY BEANS: Acetate (generic); Silver Metallic Marker (generic)

Tuesday, June 22, 2010

My Heart on a String...


To view an image up-close, please click on the photo.

I took out some "old" photos of my son, who is going to be three this year, and I simply can't believe how big he has gotten. He is growing up to be such a happy and funny little guy, but I can remember him as a sweet little tiny baby. I thought I'd make a card celebrating my baby as a baby with the color challenge over at Embellish Magazine. I was inspired by this week's wonderful sketch at 2 Sketches For You. When I saw it, I immediately thought of a locket on a chain, which got me thinking about my sentiment, "You hold my heart on a string."
To start, I chose a photo (in this one, my son is only 4 days old), and I sized it down to fit a frame I created from a die-cut scalloped heart. After cutting out my card base and trimming my pretty designer paper, I tied a bit of twine on the card and attached the heart-shaped frame. I then printed the sentiment, added a few pearls, and got a little teary-eyed when I was done.

Before I sign off, I just wanted to say thank you to everyone who has voted for me so far in this round of the Gallery Idol 2010 card competition. It's been a wonderful experience and I'm so grateful for this chance to really get creative. Voting ends tomorrow, Thursday, June 24 at noon MTN. To see my circus tent card, visit this post. If you'd like to vote, click on the widget in my sidebar or click HERE.

BEAN NOTES: Papertrey Ink Pretty Pastels Designer Paper; Stampin' Up So Saffron, Very Vanilla, Certainly Celery, and Groovy Guava Card Stock; Spellbinders Scalloped Hearts Nestabilties; SU Hemp Twine; SU Sizzix Scall
oped Square Bigz Die; Big Shot; Kaiser Green Pearls; Foam Tape; Computer & Printer HAPPY BEANS: Photograph

Monday, June 21, 2010

Something Old, Something Blue...


To view an image up-close, please click on the photo.

Before I get to the details of today's card, I wanted to thank everyone who has been leaving me such wonderful comments on my entry for this round of Gallery Idol 2010. My circus card seems to have struck a chord, and I am so thankful for all the support and good wishes! There is still time to vote, and if you'd like to see me go on to the next round (the Finals!) please use the voting widget in my sidebar or click HERE. It's been a wild ride so far and I'm crossing my fingers that I'll get to keep going!

The lovely ladies at the Cinema Saturday Creative Challenge have chosen one of my favorite all-time movies, Father of the Bride, as this week's inspiration film, with the added challenge of using something "blue." I was inspired by the scene near the end of the movie, in which Kimberly Williams' character stands at the top of the stairs waiting for her dad (Steve Martin) to watch her throw her bouquet. Of course, he misses the grand moment, and I remember being just as disappointed as he was.
I also discovered an interesting new challenge, called Twisted Thursday, which offers a fun twist on each challenge. This week's was to incorporate something "old" into the card. My something old - an old piece of designer paper I found in my stash - actually dictated the colors of my card. I thought a good jumping off point would be this week's Mojo sketch, and I started with my bouquet. To create it, I began by cutting very thin strips of green card stock for the stems and wrapped them in some pretty white organza ribbon. Next, I punched out many, many little white flowers and tiny leaves, adhering them into the shape of a bouquet, adding tiny pearl centers. My "something blue" was a single, sweet blue bloom. After embossing the white background, I assembled the card, positioning the text on the designer paper so that the "Forever" was most prominent...sigh. I do love weddings. No one I know is getting married, so maybe I should convince hubs to renew our vows?
BEAN NOTES: Designer Paper (unknown); Stampin' Up Whisper White, Basic Gray Bashful Blue, Wild Wasabi, and Kiwi Kiss Card Stock; SU Vellum; Sizzix Embossing Folder; Big Shot; SU Curly Label Punch; White Organza Ribbon (generic); Dark Silver Organza Ribbon (generic); Foam Tape HAPPY BEANS: SU Punch Pack; Kaiser White and Dark Gray Pearls

A Big Top Birthday...(Gallery Idol Top 10)...


To view an image up-close, please click on the photo.

The polls are open for voting in Round 3 of Gallery Idol 2010, and I am so proud to be counted among the ten talented card-makers. Thank you again to everyone who helped get me this far! If you would like to VOTE, please click on the link below, or click on the voting widget at the end of this post.

To vote click: Gallery Idol Round 3 VOTING

For this round, we were challenged to make a card incorporating a creative use of ribbon. I don't have a huge ribbon stash, so I was a little nervous, but when I discovered some Christmas ribbon in the closet, I knew just what I wanted to do.


To view an image up-close, please click on the photo.

I was inspired by one of my son's favorite books, If I Ran the Circus by Dr. Seuss. When I picked up two rolls of red and ivory satin ribbon, I just had to try to make a circus tent card. Admittedly, with only three days to create, I was nervous I was being too ambitious, but that what a challenge is for, right?
To begin, I sketched out a template for the card, cut it out, and used it on a piece of very thin chipboard. I knew I would need something very sturdy, as I wanted to make a shaped card. I did this twice, as I planned to pop out the top of the Big Top. I used a LOT of scor-tape to adhere the satin ribbon in alternating stripes, overlapping on the top to simulate the curve of the tent. Scalloped velvet ribbon was the perfect trim, and I added yellow flags fashioned from grosgrain ribbon and toothpicks.
To create the curtained entrance, I ran some card stock through a paper crimper and then die cut circles and cut them to make the "lit" marquee (a few clear gems worked great.)
What circus is complete without a few performers? I made the little lion's mane by unraveling some chocolate brown grosgrain ribbon and then gluing down on a base of card stock. Next, I used circle punches to create the face and ears, penning in the mouth. I free cut the body and tail, adding more frayed ribbon to the end of the the tail. Next, I sketched out and cut the shape of a seal and again used a circle punch to create the little ball. For a fun touch, I ruffled some stitched grosgrain ribbon and made the seal a cute collar. I then made two stands for each, using more pretty ribbon to decorate.
For my sentiment, which reads, "Hope Your Birthday is the Greatest Show on Earth" (thank you to my mom-in-law, Susan, for helping me decide on it!) I printed it out on a long banner in an appropriate font, and stamped a sweet little plane to fly it across my Big Top birthday tent!

Thank you so much for taking a peek at my Gallery Idol card. I hope you enjoyed it and please VOTE for your favorite, as the next round eliminates five more from the competition, taking us (me included, I hope!) to the Finals.

BEAN NOTES: Papertrey Ink Tiny Treats: Valentine (plane); Paper Co. Shimmer Card Stock; Stampin' Up Chocolate Chip, Riding Hood Red, Very Vanilla, Basic Gray, and Basic Black Card Stock; Hero Arts Clear Gemstones; Spellbinders Classic Circle Nestabilities; Big Shot; Toothpicks; Fiskars Paper Crimper; Sakura Jelly Roll Pens; Chipboard (Essentials by Ellen); Foam Tape
HAPPY BEANS: Kate's Paperie Ivory and Red No. 53 Satin Ribbon; SU Crushed Curry Grosgrain Ribbon; Chocolate Grosgrain Ribbon (generic); SU Groovy Guava Stitched Grosgrain Ribbon; Cosmo Cricket Jolly By Golly Scalloped Velvet Ribbon; TE Grab Bag Colored Ribbon; Fontspace.com (JJRingmaster) Font


Thursday, June 17, 2010

A Not-Too-Shabby Summer...


To view the image up-close, please click on the photo.

Ahoy! I'm still in a beachy, nautical mood and thought I would create a card today to match. Before I get to the details, I'd just like to let you know that today is the last day to vote for Gallery Idol 2010's Top 15 round: Masculine Garage. Voting ends at Noon! You can see my card HERE, or scroll down to the voting widget at the end of this post. Thank to everyone who has voted so far, and I'm really hoping I make it through to the next round, but I know how lucky I am to have made it this far!
Now on to today's card. How happy was I that both the Pals Paper Arts Challenge and the Shabby Tea Room are hosting summertime challenges? When I think of summer, I think of ocean breezes, gorgeous marine life, and happy days. I took some inspiration from this week's 2 Sketches 4 You sketch and the Color Cue Challenge. This is the first time for me on a couple of these challenges, and I love discovering new ones!
For this card, I wanted to try my hand a little at the shabby chic look. It's not really my usual style, though I admire it very much. I don't have much of the wonderful accoutrement that goes with it, but I did my best, and made use of some distress ink to soften all the edges of my card elements. I added some large rope twine and some raffia, alongside a pretty pearlized button, and that was that!
BEAN NOTES: Seahorse (unknown origin) and Papertrey Ink Fancy Flourishes and Birds of a Feather (sentiment) Stamps; Memento Rich Cocoa Ink; VersaMark Clear Ink; Tim Holtz Broken China and Antique Linen Distress Ink; Stampin' Up Wild Wasabi Classic Dye Ink; Copic Sketch Markers; SU Very Vanilla, Chocolate Chip, and Wild Wasabi Card Stock; SU Rope Twine; Clear Embossing Powder (generic); Foam Dimensional Squares (generic)
HAPPY BEANS: Pearlized Button (generic); Chocolate Raffia (generic); Adirondack Terra Cotta Dimensional Pearls


Wednesday, June 16, 2010

You Float My Boat (THX!)...


To view an image up-close, please click on the photo.

First off, I have a lot of people to thank. Thank you for all my sweet birthday wishes from all my friends and family. Thank you Mom for giving birth to me so that all my friends and family can send me sweet birthday wishes. Thank you to my new buddies, the crafty gals of the Gallery Idol 2010 Finalists, for their amazing talent and instant friendship! And, thank you to everyone who has voted for my card so far in Round 2 of the contest. There is still time to vote, so if you'd like to check out my card, click HERE, or scroll down to the voting widget at the end of this post...advance thanks to those of you who do!
Since I have so much to be grateful for, I thought I'd better make...what else?...a Thank You card. I was inspired by the very cool photo from Moxie Fab World's Tuesday Trigger and used this week's fab Mojo Monday sketch. When I first saw the photo of the pillow, I immediately thought of bargello, a needlepoint technique that is created through a series of upright flat stitches laid out in an interesting pattern. I decided to simulate this effect with paper by first gluing some striped designer paper to card stock, cutting it into strips, and then adhering them down in shifting positions. I think traditional borgello is more symmetrical, but I wanted to capture a bit of the laid back feel of the pillow.
Triangular flags seem to be all the rage of late, and so I created a flag banner and abbreviated "Thanks" into "T-H-X." The card was looking more and more nautical to me, and so I grabbed this sweet little boat and manipulated the sentiment to curve under it. To create the "rope-like" frame around the boat, I simply put together two scalloped circles that were the same size. A little twill tape across the backdrop and I was all ready to thank one of my many supporters, whom without, my 'boat' would surely sink!
BEAN NOTES: Papertrey Ink Tiny Treats: Valentine Stamps; Pink Paislee Designer Paper; Stampin' Up Basic Black and Real Red Classic Dye Ink; Copic Sketch Markers; Spellbinders Classic Circle and Scalloped Circle Nestabilities; Making Memories Red Glitter Stickers; Big Shot; Brads (generic); Foam Dimensional Squares (generic)
HAPPY BEANS: SU Twill Tape