Friday, October 29, 2010

Trick or Sweet...

 to view an image up-close, please click on the photo

I love being inspired by other papercrafters. One of my favorite crafty people is my mom-in-law, Susan. I thought I would showcase one of the fantabulous Taylored Expressions Halloween cards she sent to the rugrat (along with some scrumptious cookies!) using the adorable set, Trick or Sweet. Don't you just love the paper-piecing and all the little details? Below, you'll find the inside, which is just a darling. By the way, did you know that you can find some amazing projects on the TE Gallery HERE? Susan was inspired by this card by Denise Marzec to create her own version of what is for sure the "Sweet" of one of my favorite holidays! If you like what Susan did with it, please leave a comment that I will be sure to pass along! Happy Haunting!

BEAN NOTES:
  • Stamps: Trick or Sweet (Taylored Expressions)
  • Cardstock: Choice Snow (TE), Various Colors (Stampin' Up!)
  • Ink: Memento Tuxedo Black (Tsukineko)
  • Patterned Paper: Cast a Spell, Welcome Neighbor, Noveau Chic (SU!)
  • Tools: Decorative Label Punch (SU!)
HAPPY BEANS:
  • Accents: Brad, Metallic Marker, White Gel Pen (generic)

Wednesday, October 27, 2010

Apple Pickin'...

to view the image up-close, please click on the photo


I finally got around to making one of the bazillion scrapbook pages that I still need to do for the rugrat's scrapbook! I cheated by making one of the more recent ones because it was still fresh in my mind. We had the pleasure of going apple picking with our new friends we made here in New York. It was a first for me as well as for the little guy, and we had a ton of fun.
This is also only the third time I've used my Cricut machine, and so I'm still figuring out how to use it. Please excuse the quality of my photo--I'm still trying to get the hang of photographing scrapbook pages! I have been amazed at how huge the scrapbooking world is and my page pales in comparison to the many incredible samples I've been perusing. I was inspired by the fun color challenge on the City Crafter Challenge, though I have to admit that the challenge photo was what really got me going! I can't wait for next year's apple harvest...I might actually be caught up with the scrapbooking by then!

BEAN NOTES
  • Cartridges: Cricut Plantin Schoolbook, Sans Serif, Preserves, and Cindy Loo (ProvoCraft)
  • Patterned Paper: Summer Picnic (Stampin' Up!)
  • Cardstock: Wild Wasabi, Summer Sun, Real Red (SU!); Textured Cardstock (DCWV)
HAPPY BEANS
  • Tools: Grass Border Punch (Martha Stewart Crafts)
  • Photos


Tuesday, October 26, 2010

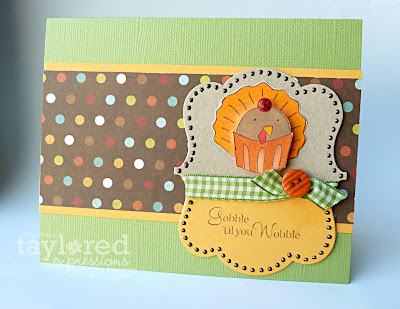
Gobble 'til You Wobble!...

to view the image up-close, please click on the photo

October is almost over and so it's time to start thinkin' about Turkey Day! This week's Card Positioning Systems sketch is being sponsored by Taylored Expressions, and so I thought I'd use it as an opportunity to break out my Gobble, Gobble set and get going on my Thanksgiving cards.


SPILLING THE BEANS
  1. Make card from cardstock.
  2. Trim patterned paper; mat and adhere.
  3. Die-cut kraft and yellow cardstock. Stamp sentiment. Trim die and adhere. Tie ribbon, attach button; adhere.
  4. Stamp turkey cupcake twice. Color with markers. Fussy cut turkey feathers/cupcake and adhere. Fussy cut cupcake portion and adhere with foam tape.
  5. Apply liquid dimensionals.
BEAN NOTES
  • Stamps: Gobble, Gobble and A Year of Sweet Sentiments (Taylored Expressions)
  • Ink: Memento Rich Cocoa (Tsukineko)
  • Cardstock: Parakeet Bazzil Textured from October Key Ingredients (TE); Summer Sun (Stampin' Up!)
  • Patterned Paper: Apple Cider (Imaginisce) from October Key Ingredients (TE)
  • Fibers: Gingham Ribbon from October Key Ingredients (TE)
  • Accents: Orange Button from October Key Ingredients (TE)
HAPPY BEANS

Monday, October 25, 2010

Merry & Bright...

to view the image up-close, please click on the photo

Ooooh, it's another Monday, though it's really a very special one at my house. Today my little rugrat turns three! I can hardly believe that he is already in school and getting so gosh darn big. We are actually celebrating in a couple weeks so that his Nana and Papa can be here with us, so I'm not celebrating with a birthday card for today's 2 Sketches 4 You Challenge, but am instead featuring a Christmas card using stamps from this week's fun sponsor. Though, I hope you will indulge my showing off a couple then and now pics of my sweet baby boy. By the way, beginning in November, you will have some fresh inspiration from two very talented ladies (Mona Pendleton and Julie Lacey) who are joining the 2S4Y Design Team alongside myself (thank you, Kazan and Laura for inviting me to continue on the team...it's been a blast!) So, if you have a chance, check out today's challenge in which the Card of the Week will win a cool prize.


SPILLING THE BEANS
  1. Make card from cardstock.
  2. Trim red cardstock strip; adhere.
  3. Ruffle ribbon (pull one stitch taut and gather edge.) Adhere with sticky tape.
  4. Trim patterned paper; mat and adhere.
  5. Stamp poinsettias on white cardstock. Accent with metallic marker. Stipple ink background. Apply rub-on sentiment. Die-cut and apply Liquid Pearls. Adhere with foam tape.
BEAN NOTES
  • Stamps: Poinsettia (Starving Artistamps)
  • Ink: Real Red Classic Dye (Stampin' Up!)
  • Rub-On: Chit-Chat (SU!)
  • Cardstock: Certainly Celery, Real Red, Whisper White (SU!)
  • Patterned Paper: Tinsel & Twig (Girls Paperie)
  • Dies: Labels Seventeen Nestabilities (Spellbinders)
  • Accents: Rouge Liquid Pearls (Ranger)
  • Fibers: Pure Poppy Stitched Grosgrain (Papertrey Ink)
HAPPY BEANS
  • Coloring Medium: Red Metallic Marker (Sakura)

Friday, October 22, 2010

A Little Holiday Wonder...(TE Blast From the Past Blog Hop!)...

to view the image up-close, please click on the photo

I love the look on my little rugrat's face on Christmas morning when he sees the presents nestled under his little tree. I can't wait for this year because I think he is finally old enough to really appreciate the idea of Santa Claus. So, for this month's Taylored Expressions Blast from the Past Blog Hop celebrating Christmas and the holidays, I thought I'd create a fun little decorative scene using the adorable stamps from the Holiday Wonder set.

To make this little house, I used the housefront stamp and simply stamped it twice to create the front and back (flip the trimmed second image over for a perfectly lined-up back panel.) For the walls, I used a marker to draw in the clapboards to match. The entire house sits on a "snowy" lot made from some adhesive-backed felt. For the roof, I border punched strips of scallops and added some sparkly Stickles. To decorate the house itself, I paper-pieced the door, windows, and curtains, cutting out the main window and added the wee Christmas tree. What house is ready for the holidays without some strung lights? A snowman greets hello, and the cute little mailbox is just waiting for some Christmas cards to arrive!

(No "Spilling the Beans" today, as I think it might get a bit too long. If you'd really like to make this little house yourself and want some step-by-step instructions, zip me an email and I'll be happy to oblige.)

BEAN NOTES
HAPPY BEANS
  • Specialty Paper: Adhesive-backed Felt (generic)
I'm so glad you stopped by and I hope you find a little creative Christmas inspiration today!

Wednesday, October 20, 2010

Welcome, Great Pumpkin!...

to view the image up-close, please click on the photo


I just love the movie, It's the Great Pumpkin Charlie Brown!, and I can't wait until the day my little rugrat is old enough to enjoy it. This year might be the year, and so I thought I'd make a card in anticipation of our first viewing together. I was inspired by this week's Color Throwdown colors and the adorable patch of pumpkins in the Gobble, Gobble set from Taylored Expressions. By the way, Taylor is doing a terrifically fun 12 Days of a Handcrafted Christmas over on her blog, with great projects and a giveaway, so check it out if you are looking for ideas for handmade gifts this season!

SPILLING THE BEANS
  1. Make card from cardstock.
  2. Trim patterned paper and mat. Tie ribbon and adhere.
  3. Stamp pumpkins and cut out. Color with markers and adhere with foam tape.
  4. Print sentiment, trim, and mat. Cut signpost, assemble, and adhere with foam tape.
BEAN NOTES
  • Stamps: Gobble, Gobble (Taylored Expressions)
  • Cardstock: Perfect Plum, Concord Crush, Dusty Durango, Whisper White, Crumb Cake (Stampin' Up!)
  • Ink: Memento Tuxedo Black (Tsukineko)
  • Patterned Paper: Matilda (Cosmo Cricket)
  • Fibers: So Saffron Grosgrain Ribbon (SU!)
  • Coloring Medium: Sketch Marker YR18, YG95 (Copic)
HAPPY BEANS
  • Font: Chalkboard (www.microsoft.com)
Some fun news: I have a Halloween card featured on the Clear & Simple Stamps iPhone/iPad App this Saturda, October 23! Check it out by clicking HERE:


Monday, October 18, 2010

New Digs...

to view the image up-close, please click on the photo


If you are looking for this week's 2S4Y sketch and card, please click HERE.
My lovely friend, Heather, and her darling family have finally moved into their new digs. I am so happy for them and I wanted to send them a little housewarming gift to help celebrate. To go along with it, I created a card inspired by this week's Mojo Monday sketch and the fun Scrappy Saturday "Celebrate Good Times" Challenge.

SPILLING THE BEANS

  1. Make card from cardstock.
  2. Trim yellow cardstock and adhere.
  3. Trim light blue cardstock and adhere.
  4. Trim light green cardstock, border punch, and adhere.
  5. Trim green cardstock, border punch, emboss. Adhere.
  6. Adhere light green cardstock strip. 
  7. Stamp house on cardstock. Fussy cut and adhere. Paper piece roof.
  8. Tie ribbon and adhere bow. Attach button with embroidery floss.
  9. Die-cut cloud. Stamp sentiment and adhere with foam tape.
BEAN NOTES
  • Stamps: Wonderfully Whimsical and Fillable Frames #3 (Papertrey Ink)
  • Ink: Memento Rich Cocoa (Tsukineko); Peach Parfait Classic Dye (Stampin' Up!)(
  • Cardstock: Crumb Cake, Crushed Curry, Soft Sky, Wild Wasabi, Pear Pizazz, and Whisper White (SU!)
  • Tools: Swiss Dots Embossing Folder (Provo Craft)
  • Fibers: Crushed Curry Grosgrain Ribbon(SU!); White Embroidery Floss (generic)
  • Accents: Orange Button (Basic Grey)
HAPPY BEANS
  • Dies: Clouds (PTI)


Peace, Joy, and a Bonus Sketch!...

to view the image up-close, please click on the photo

Today is a very fun Monday, as it's my first time ever designing a sketch! This week, at 2 Sketches 4 You, it's double the fun. Along with another of Kazan's fab sketches, we have a Bonus Sketch for you, designed by moi. I was so excited to find out that this week's sponsor is also Clear & Simple Stamps! So, head on over to the 2S4Y site and play along with either sketch for a chance to win some cool goodies.
Of course, I chose to play with the Bonus Sketch, and I was so happy to get to use what has become one of my favorite Christmas sets from CSS, O' Tree. It's clean and chic, and for this card, I took one of the Christmas trees and turned it into the 3-D main focus of my card. Now I am really getting into the holiday mood...and it's only October!

SPILLING THE BEANS
  1. Make card from card stock.
  2. Trim patterned paper and adhere.
  3. Trim green patterned paper. Mat with card stock and adhere.
  4. Trim card stock into square. Adhere. Attach brads.
  5. Punch three white squares from card stock. Stamp sentiments. Mat with card stock.
  6. Stamp Christmas tree three times on green card stock. Fussy cut and adhere together with glue. Adhere. Color star with glitter pen; fussy cut and adhere.
BEAN NOTES
  • Stamps: O' Tree (Clear & Simple Stamps)
  • Ink: Memento Tuxedo Black (Tsukineko)
  • Card Stock: Wild Wasabi, Rose Red (Stampin' Up!); Classic Solar White (Neenah)
  • Patterned Paper: Jolly Holiday (SU!)
  • Accents: Brads (Basic Grey)
  • Tools: Square Punch (EK Success)
HAPPY BEANS
  • Coloring Medium: Glitter Pen (Sakura)

Friday, October 15, 2010

Sentimentally Spooked...

to view the image up-close, please click on the photo

Happy Friday! Halloween is quickly approaching and I thought I had better get finished up with my spooky cards, so I broke out the new Beware set from Clear & Simple Stamps and got my boo on. For this card, I wanted to see what I could do with all the cute little sentiments from the set, and so I placed all of them on a large clear acrylic block and applied the ink using the gradient technique. I thought it made for a eerily elegant card for this trickiest of holidays.

SPILLING THE BEANS
  1. Make card from card stock.
  2. Trim patterned paper; mat with card stock and tie ribbon. Adhere.
  3. Arrange stamps on acrylic block. Ink and stamp on card stock; sponge. Die cut label. Mat and adhere with foam tape.
  4. Apply liquid dimensionals.
BEAN NOTES
HAPPY BEANS
Enabler Alert! During the month of October, enter code CSS010 at check out for a $1 discount!


Thursday, October 14, 2010

Two Tweets...

to view an image up-close, please click on the photo

I'm in a springtime mood today, despite the brisk autumn air. So, when I saw the color combo over at the Play Date Cafe Challenge, I thought I'd try to bring a little spring into the air today. I took out my favorite Tweethearts set from Taylored Expressions and got stampin'.

SPILLING THE BEANS
  1. Make card from card stock.
  2. Die-cut scallop square and adhere.
  3. Stamp sentiment.
  4. On white card stock, sponge sky, stamp branch and hearts. Die cut.
  5. Stamp birds and leaves with gradient technique. Fussy cut and adhere with foam tape.
  6. Apply gemstones.
  7. Tie ribbon.
BEAN NOTES:
  • Stamps: Tweethearts (Taylored Expressions)
  • Card Stock: Choice Snow (TE); Marina Mist (Stampin' Up!)
  • Chalk Ink: Gingerbread, Key Lime, Aloe Vera, Aquatic Splash, Turquoise Gem, Malted mauve, Pixie Dust, Red Brick, Tea Leaves, Spanish Olive VersaMagik (Tuskineko)
  • Specialty Ink: Cosmic Copper, Pearlescent Orchid Brillance Pigment (Tsukineko)
  • Dye Ink: Marina Mist (SU!)
  • Fibers: Marina Mist Satin Ribbon (SU!)
  • Dies: Labels One, Big Scallop Squares Nestabilities (Spellbinders)
HAPPY BEANS

Wednesday, October 13, 2010

Hearts Come Home (JustRite 12 Weeks of Christmas Blog Hop #6)...

 to view an image up-close, please click on the photo

I was so thrilled and honored when JustRite Stampers invited me to be a part of their 12 Weeks of Christmas Blog Hop. They have put together an incredible line-up of designers who, over twelve Wednesdays until Thanksgiving, will showcase some of the most creative Christmas ideas and projects out there using the JRS Christmas Collection of stamps. This week features most of the Copic design team and Certification Instructors! Lucky me, I get to be a part of it this week, too,  and I wanted to make a special card.
I love it when an idea I have in my head turns out exactly as I envisioned. When I saw the images in the Christmas Nested Frames & Occasions set, I wondered to myself whether or not I could use them to create a cozy holiday scene. I pulled out the stamps, along with a couple other fab holiday sets, and got to work. Before I "spill the beans" on how I created this card, I just want to point out that the garland on the fireplace is actually one of the border images! I simply inked it in on three sides. I then drew the mantle and fireplace around it. I was tickled to see that one of the smallest of the nested sentiments (my favorite) was the perfect size to make for a pretty framed picture above the fireplace. When I was finished, I really did feel that hearts do come home for the holidays.

SPILLING THE BEANS
  1. Make card from card stock.
  2. Trim patterned paper and adhere.
  3. Trim gray card stock and adhere.
  4. Trim white card stock and score; adhere. Trim card stock strip and adhere.
  5. Stamp three sides of holly border on card stock and color. Draw mantle and fireplace. Fussy cut and adhere with foam tape.
  6. Stamp border and sentiment on white card stock, color and adhere with foam tape.
  7. Stamp mini tree and wreathe. Fussy cut and adhere.
  8. Stamp stockings and color. Fussy cut and adhere with foam tape/glue.
  9. Border punch black card stock. Trim and adhere with glue.
BEAN NOTES
  • Stamps: Christmas Nested Frames & Occasions, Old Fashioned Christmas, and From Our House (JustRite Stampers)
  • Ink: Memento Tuxedo Black (Tsukineko); Pure Poppy Hybrid (Papertrey Ink)
  • Card Stock: Basic Gray, Baja Breeze (Stampin' Up!); Classic Solar White (Neenah)
  • Patterned Paper: Thrift Shop Collection (October Afternoon)
  • Coloring Medium: Sketch Markers (Copic); Glitter Pen (Sakura); Metallic Pens (Sakura)
HAPPY BEANS
I hope you enjoyed my JustRite hop project. Now, for more holiday inspiration, visit the lovely Jennie's blog and, if you hop off for a bit, just hop back on using the list of links below!
JustRite Inspiration Blog
Sharon Harnist
Debbie Olson
Kellie Fortin
Becca Feeken
Marianne Walker
Kathy Jones
Barb Schram
Lori Craig
Stephanie Kraft
Jenn Balcer
Angela Barkhouse
Sherrie Siemens
Sankari Wegman
Colleen Schaan
Regina Mangum
Jennie Black
Kazan Clark
Sally Lynn MacDonald
Michele Kovack

Tuesday, October 12, 2010

A Whale of a Time!...

to view an image up-close, please click on the photo

My little boy shares a birthday with one of his friends, a sweet girl named Anna. She is the cutest, tiniest little thing and he will be attending her birthday party in a couple of weeks -- his first ever! I thought I would create a fun card for her and I was inspired by the Perfectly Placed Pleats Challenge over at Moxie Fab World. I wanted to try my hand at making something that could show off this easy and fun technique.


Since Anna is such a little thing, I thought it would be a cute contrast to make her a card starring something as huge as a whale. For my card, to help along my happy pleated whale, I pleated some clouds and the crests of the ocean waves and I hope my guy's wee friend has a whale of a good time on her special day! (BEAN TIP: If you are having trouble manipulating your paper into pleats, try a lighter weight stock.)

SPILLING THE BEANS
  1. Make card from card stock.
  2. Die-cut scallop square. Adhere.
  3. Trim Marina Mist card stock. Adhere.
  4. Pleat white paper in a wave pattern. Adhere.
  5. Border punch card stock; stamp sentiment.
  6. Pleat card stock. Stamp whale and fussy cut. Adhere.
  7. Stamp spray.
  8. Pleat white paper. Die-cut clouds and adhere.
BEAN NOTES
  • Stamps: Critters in the Sea (Lawn Fawn)
  • Ink: Fresh Snow Hybrid (Papertrey Ink); Memento Tuxedo Black (Tsukineko)
  • Card Stock: Marina Mist, Tempting Turquoise, Peach Parfait (Stampin' Up!); Computer paper
HAPPY BEANS
  • Tools: Bigz Scallop Square (Sizzix); Dotted Wave Border Punch (EK Success); Clouds Die (PTI)

Monday, October 11, 2010

Dreaming in Technicolor...

to view an image up-close, please click on the photo


Aaah, it's another Monday and the last week just flew by! With all our icky weather here in New York, I was really pining for some California sunshine. So, I thought I'd use this week's 2 Sketches 4 You sketch from the super sweet Kazan to warm up my day. I went with this very cute surfing Cuppie from the Beach Bum set from Taylored Expressions. But, to really get to the sunny side of the ocean, I used some very bright, and very colorful patterned paper. Now, where did I put my surfboard?
Now, head on over to 2S4Y... Laura and Kazan have announced our newest Design Team member, Laurie Wilson, and I know she'd love to create with you! Also, I hope you join us next week as I try my hand at a sketch with a Bonus Sketch, a very cool sponsor, plus another chance to become a member of the team! So, get your creative mojo flowin' and have a great week!

SPILLING THE BEANS
  1. Make card from card stock.
  2. Trim patterned paper. Sponge clouds. Adhere. 
  3. Stamp sentiment.
  4. Tie ribbon and bow.
  5. Die cut inverted scallop circle; adhere with glue.
  6. Stamp Surfboard Cuppie; color. Die cut and adhere with foam tape.
  7. Apply liquid dimensionals.
BEAN NOTES
  • Stamps: Beach Bum (Taylored Expressions)
  • Ink: Memento Tuxedo Black (Tsukeneko); Fresh Snow Hybrid (Papertrey Ink)
  • Card Stock: Choice Snow (TE); Peach Parfait and Marina Mist (Stampin' Up!)
  • Patterned Paper: Snow Day Project Pantry, "Snow Day" (Crate Paper)
  • Fibers: Marina Mist Satin Ribbon (SU!)
  • Coloring Medium: Sketch Markers (Copic)
HAPPY BEANS

Friday, October 8, 2010

Wicked...

to view an image up-close, please click on the photo


It's Friday! This month's Stamp of the Month, Beware, from Clear & Simple Stamps has me feeling a bit "wicked" today. I thought I would create a spooky tag that I could give to my hubby for Halloween (tied to some kind of disgustingly sweet candy -- no one on the planet has a bigger sweet tooth than he does!) Beware includes the uber-cool skull and cross-bones and I gave this creepy fella some glowing eyes by inking up the eyes of one of the pumpkin images in the same set. Hope your day includes some wicked good fun!

SPILLING THE BEANS
  1. Make tag from black card stock. Mat with card stock.
  2. Stamp skull and cross-bones.
  3. Stamp eyes.
  4. Stamp sentiment.
  5. Stamp witch's hat and spider. Shade with marker. Fussy cut and adhere with foam tape.
  6. Punch slit. Thread ribbon and tie.
BEAN NOTES
  • Stamps: Beware (Clear & Simple Stamps)
  • Card Stock: Perfect Little Black Dress, You're Such a Gray-cious Host (CSS); Dusty Durango (Stampin' Up!)
  • Ink: Fresh Snow Hybrid (Papertrey Ink); Memento Tuxedo Black (Tsukineko)
  • Specialty Ink: Encore! Bronze Metallic (Tsukineko)
  • Coloring Medium:  Sketch marker C3 (Copic)
  • Tools: Slit and Corner Punches (SU!)
  • Fibers: Black Grosgrain Ribbon (generic)
HAPPY BEANS
Enabler Alert! During the month of October, enter code CSS010 at check out for a $1 discount!

Thursday, October 7, 2010

Gobble, Gobble! (TE Release Day!)...

 to view an image up-close, please click on the photo


It's Release Day at Taylored Expressions! Do you remember this card I made on Sneak Peek Day 1? (Feel free to check it out HERE.) Well, I thought I would make some fun place cards to go along with the centerpiece card and send the entire set to my wonderful in-laws. My mom-in-law puts on a swell spread, and though we won't be going home for the holidays, at least we could send along a little bit of sweet tidings to show how thankful we are for our family. So, I took out the absolutely adorable new set, Gobble, Gobble, and got cookin'! 


SPILLING THE BEANS
  1. Make place card from card stock.
  2. Print name on card stock; mat with patterned paper. Adhere.
  3. Apply liquid pearls.
  4. Stamp Cuppie; color with markers. Fussy cut and adhere with foam tape.
  5. Stamp pumpkin; color with markers. Fussy cut and adhere.
  6. Repeat for each place card.

BEAN NOTES
HAPPY BEANS
  • Font: Amelie (www.fonts101.com)
Well, that wraps up another fresh and fun Release Week! By the way, if you are new to TE, you may be curious about what the stamps are actually like. They are wonderful, deeply-etched rubber that come pre-cut (yay!) and cling perfectly to acrylic blocks. The TE store is now open, and I hope you enjoyed this week's projects. For more inspiration, check on the rest of the Baker's Dozen blogs. Thanks so much for stopping by!

The Baker's Dozen