Showing posts with label Congratulations. Show all posts

Wednesday, June 6, 2012

Forever in Bloom...Taylored Expressions Sneak Peek Day 3!

June Release At a Glance
  • We have sneak peeks to share Monday through Wednesday.  All of the new products will be available for purchase on Thursday, June 7th at 8 am PST. You'll find it all in the Fresh out of the Oven Department at the Taylored Expressions Store. 
  • Join us as a fan on Facebook for an early peek at the stamp sets, as well as a SPECIAL Facebook GIVEAWAY, on Wednesday night beginning at approximately 6 pm PST.

Thanks so much for dropping in for the third day of sneaky peekies for Taylored Expressions! Today I have a sweet card to share using the soon-to-be released Forever in Bloom stamp set, featuring one of my favorite flowers -- hydrangeas. Also, I will be sharing with you the new coordinating die, which makes this set really pop!


For my card, I stuck with the classic hydrangea colors, plum and green. After stamping the large set of blooms, including the outlines, I die-cut it, the stems, and two leaves. For a little extra something, I sponged around the edges and also misted on with some shine mist. I just love the dimension of this card!

BEAN NOTES
Stamps: Forever in Bloom (Nancy McKinney for Taylored Expressions)
Ink: Lovely Lilac, Pear Pizazz, Wild Wasabi (Stampin' Up!); Memento Rich Cocoa (Tsukineko)
Cardstock: Classic Cream (Neenah); Lovely Lilac, Pear Pizazz (Stampin' Up!)
Dies: Hydrangea Blooms (Taylored Expressions); Labels 18 (Spellbinders)
Tools: Rounded Punch (Stampin' Up!)
Accents: Silver and Shine Mister Huey (Studio Calico)

I hope you have a lovely and blooming day! For more inspiration and peeks, please don't forget to visit the rest of the Baker's Dozen.


Tuesday, April 10, 2012

Circus of Dreams...


Happy Tuesday! I am so excited to share today's projects with you as this is my first month working with Lifestyle Crafts and an Affiliate! As such, I get to create projects that will hopefully inspire my readers and feature some products that I love. Plus, the "yay" part is that I get to offer you an exclusive discount from the Lifestyle Crafts store! Keep reading for details and I hope you have fun along the way...


This month's Limited Edition Big Top Dies release is circus themed, which has been so popular with recent books and movies. Not just for children anymore, I love that I can create circus projects that can be both elegant and whimsical. For my release projects, I decided to create a trio of cards to showcase some of these darling dies.


My first card features three newly-released Dies -- Ring Master (alphabet), Carousel, and Pennants. I was inspired by this lovely patterned paper for my colors and designed this card to capture an old-fashioned circus feel. The separate pieces of the carousel horse make it possible to create the horse alone and with or without decorations.
(I will have another project using this adorable die tomorrow if you'd like to see more!)


If any of you have read the imaginative novel, The Night Circus, you will have been struck by the visual artistry of the author's descriptions of the magical roving circus that only opens at sundown. I was inspired by the book to create the unusual birthday card below for a creative friend of mine.


 I used the newly released Tent 4 x 4 cutting die from Lifestyle Crafts to create my "circus of dreams." Of course, the tent can be cut from bright, fun colors as well, but for mine I went with the whimsical black and white, with just a touch of red for the beckoning curtain.

I also used the previously-released Nesting Rings die to create my "moon" rising over the big top. With the perfect sentiment, I had a card ready for one of my most imaginative friends.


My third card is a whimsical and sweet card I created with the new Hot Air Balloon die. There are a ton of options for how the balloon can be decorated. I used some pretty patterned paper for the balloon itself and added a wooden button.


The Hot Air Balloon Die includes dies to create a cute little medallion, from which I created my little pennants for my sentiment. Talk about a time-saver, as creating these by hand would have taken me all day! 

BEAN NOTES
Hooray Card
Dies: Limited Edition Carousel, Pennants, and Ring Master 4 x 4 Quickutz Dies (Lifestyle Crafts)
Patterned Paper: Lost & Found Rosy (My Mind's Eye)
Cardstock: Pool Party, Very Vanilla (Stampin' Up!); textured (American Crafts)
Accents: Paper Flowers (Prima)
Tools: Creative Station (Xyron)

Wish Big Card
Dies: Limited Edition Tent 4 x 4 Quickutz Die, Nesting Rings Quickutz Die (Lifestyle Crafts)
Cardstock: Real Red, Basic Black, Whisper White (Stampin' Up!)
Stamps: sentiment (Papertrey Ink)
Tools: Creative Station (Xyron)
Ink: Memento Tuxedo Black (Tsukineko)

Up, Up & Away Card
Dies: Limited Edition Hot Air Balloon 4 x 4 Quickutz Die (Lifestyle Crafts); Clouds Duo (Papertrey Ink)
Patterned Paper: Songbird (Prima)
Cardstock: textured (Bazzil); Very Vanilla (Stampin' Up!)
Fibers: Lace (Kate's Paperie)
Stickers: alphabet (Pink Paislee)
Tools: Creative Station (Xyron)

I hope you enjoyed my trio of cards today! 
As an Affiliate, I get to offer my readers an exclusive savings discount code! For a 20% off discount on the dies shown here and everything else in the Lifestyle Crafts store, enter the promo code: BEAN at check-out.

Happy crafting!


Monday, September 12, 2011

A New Home for Nana...


My in-laws shared some really exciting news with us recently -- my father-in-law is close to retirement and they decided to buy a new house! It's a really darling little house near their old one where my husband grew up and we are so happy for them. I wanted to make a card to congratulate them on their new "digs" and so I got out my favorite house set, Cozy Cottages from Taylored Expressions.
I was inspired by this weekend's Our Creative Corner challenge, Wonderful Windows, so I stamped and colored this cute little shoe house, and livened it up with some bright, fun colors before fussy cutting and placing it behind a simple, popped up window. I added some border die grass and a blue sky background and the perfect sentiment. We'll be spending a lot of time at the new house -- beware of house guests who overstay their welcome, Nana and Papa!

BEAN NOTES
Stamps: Cozy Cottages (Taylored Expressions)
Cardstock: Bazzil; Solar White (Neenah)
Ink: Memento Rich Cocoa (Tsukineko); Pink Passion (Stampin' Up!)
Dies: Grass Border (TE); Classic Oval Nestabilities (Spellbinders)
Coloring Medium: Sketch Markers (Copic)


Wednesday, March 9, 2011

Superstar!...

to view the image up-close, please click on the photo
It's been a bit of a stressful week here in Beanland, but I have a card to share. It's Anything Goes week at Simon Says Stamp, so here we go! I used a border punch that has been sitting around my craft space for weeks and layered the border -- I filled in the negative spaces with the positives from punching through some colored scraps! With a bright happy yellow star and a stamped "Superstar" sentiment, I had a happy card to send off to brighten someone's day.

BEAN NOTES

  • Stamps: Starstruck (Verve)
  • Cardstock: Whisper White, Real Red, Tangerine Tango, Crushed Curry, Perfect Plum, Wild Wasabi, Tempting Turquoise (Stampin' Up!)
  • Specialty Paper: Vellum (Papertrey Ink)
  • Hybrid Ink: True Black (PTI)
  • Tools: Classic Stars border punch (Martha Stewart Crafts)
  • Dies: Stars Five Nestabilities (Spellbinders Paper Arts)


Tuesday, November 16, 2010

A New Hive...

to view the image up-close, please click on the photo

My very lovely and talented sister-in-law, Lizz, has taken a big plunge. Having lived all her life in the same town, she has just moved into a new apartment in the heart of San Francisco. My sissy has so much style, flaire, and gorgeous good looks that she is sure to set the city all a dither. I wanted to make her a special card to help her celebrate the big move. 
I personally detest the act of moving, but I was inspired by this week's Scrappy Saturday Challenge to dig out some patterned paper from my massive stash. I also used the very cool sketch from the Everything But the Kitchen Sink Challenge, which I thought was a perfect way to show off the paper. The little bee has discarded its plain old hive for a new "upscale" and stylish abode, just like my fabulous sister. Good luck, sweet Lizz, on your new adventure!

SPILLING THE BEANS

  1. Make card from cardstock.
  2. Punch squares from cardstock and patterned paper. Adhere with glue.
  3. Trim cardstock. Stamp sentiment and dotted pattern. Tie ribbon. Mat with cardstock and adhere.
  4. Stamp bee and hive. Color and fussy cut. Adhere with foam tape.
  5. Stamp hive on patterned paper. Fussy cut and adhere with foam tape.
BEAN NOTES
HAPPY BEANS


Sunday, August 29, 2010

One Lucky Girl...

to view the image up-close, please click on the photo

I know I say this a lot, but I really do have the BEST mom-in-law in the world. Susan is like a second mother to me and is my best girlfriend. I know I'm pretty darn lucky to have her in my life, and today I am sharing another piece of evidence at how wonderfully wonderful she is.

There is a secret that I've been keeping and it's a doozy. All I can say is that, despite the fact that a secret is a secret, I just HAD to tell Susan. She is my biggest fan and I felt an unquenchable need to spill the beans.

The card I'm featuring today is NOT one of mine. It is a masterpiece of talent and love. Susan sent this to me and I've been dying to share it. I'm going to admit it: I'm SO jealous that I can't claim it as one of my own! Check out those teeny tiny sweet greeting cards in those baskets! I love, love, love everything about this card, from the gorgeous color combo to the cute patterned papers. The inside of the card reads: "Enjoy the Ride." I'm pretty sure, with a mother-in-law like mine, there isn't any way I can't.

If you are curious to know about my secret, tune in tomorrow!

XOXO,

Tuesday, August 17, 2010

A Home Made for Heather...

to view the image up-close, please click the watermark

My good friend, Heather, has a dream and it is about to come true. I know that she and her adorable family had been looking for a house to buy for a very long time. I just got word that they have finally done it and will be moving to their new home very soon. I wanted to congratulate her with a card, especially as I'm sure she could use a lift from packing!
For this card, I was inspired by the wonderful colors of this week's Color Cue Challenge. I began by stamping the curtains behind this pretty window, then cut it out. I added some Flower Soft "blooms" in the sill for a homey feel. Next, I embossed my aqua panel with an embossing folder, trimming my card stock elements and then stamping the perfect sentiment. I then added some paper flowers, complete with button, and adhered it to a bright red ribbon. I'll be sending this off the Heather with the warmest and happiest wishes for her new home.
BEAN NOTES: Papertrey Ink Home Made Stamps; Memento Rich Cocoa Ink; PTI Pure Poppy Hybrid Ink; PTI Aqua Mist and Pure Poppy Card Stock; Stampin' Up So Saffron and Very Vanilla Card Stock; Sizzix Embossing Folder; Big Shot; Paper Flowers (generic) PTI Aqua Mist Vintage Button; Foam Tape
HAPPY BEANS: Flower Soft

Thursday, August 5, 2010

Celebrate with Style...

to view the image up-close, please click on the photo

Hey there! I'm finally back home and recovering from a wee bit of jet lag and another 5-hour flight with a very active rugrat! Oh, it's good to be home. I haven't made a single card for a couple weeks and I hope to get back into the groove as soon as possible! Next Monday is my first week on the 2 Sketches 4 You Design Team and I can't wait to get creating. I hope you join me for some fun.
In the meantime, I can share a card that I made for a recent publication call. I hate to call them "rejects" -- it sounds so sad. So, I'll just say this one was gently passed up...LOL!
For this card, I started by stamping a large panel of gray card stock with VersaMark and then embossed them in clear to achieve the darker gray dots. I then trimmed the piece into four panels. Next, I stamped my sentiment on my card base before adding a pink panel, adhering the gray pieces with foam tape. With just a little silver ribbon, I had a stylish, chic card to help someone celebrate.
BEAN NOTES: Papertrey Ink Dot Spot and Big Bold Wishes (sentiment) Stamps; VersaMark Clear Ink; PTI Fresh Snow Hybrid Ink; Stampin' Up Basic Gray and Pink Pirouette Card Stock; Foam Tape; Clear Embossing Powder
HAPPY BEANS: Silver Organdy Ribbon (generic)

Monday, June 28, 2010

You're the Pick of the Patch...Gallery Idol FINAL Round


To view an image up-close, please click on the photo.

Today is the first day of voting for the Final Round of Gallery Idol 2010. It has been an incredible journey and a sincere honor to have had this chance to compete. The caliber of talent in the Top 5 is astonishing, and I can say that the best part of this experience has been getting to know some amazing paper-crafters. A heartfelt thank you to everyone who voted me in the final five and for all the love and support! Also, thank you to Kelly Smith at Paper Crafts magazine for making this so much fun.

If you would like to vote, please feel free to use the voting widget in my sidebar or click HERE.

This round's theme was an "Inspired by" challenge, based on this photo:


We moved to Manhattan from St. Paul, Minnesota just a few months ago, so the inspiration photo actually got me thinking about berry picking in the Mid-West. The fruit is luscious, the farms are beautiful, and I was inspired by the photograph to create a card celebrating the happy fun of this summer pastime. I had to work quickly, with again only 3 days to create, and I hope you like the "fruit" of my efforts.

To begin, I sketched out the general idea of my card. Whenever I have something more complicated to do, I love to draw it out on graph paper, which really helps with dimensions and perspective. I decided to tackle the tractor first.
I traced out a pattern with a the aid of a light table and used it to cut out the various pieces of the tractor, beginning with a chipboard base, followed by two shade of green card stock. To add some depth, I sponged ink around each element. For more dimension, I double-traced and cut extra pieces of some of the parts. I wanted the tractor to shine like metal, so I applied glassy glaze to the darker green pieces. The wheels were carefully die-cut and circle punched, with a lot of trial-and-error to get the size correct. Tiny silver circles served as my "nuts and bolts."
Setting the tractor aside, I tackled the wagon by running some yellow card stock through my Big Shot with a woodgrain embossing plate. Then, I cut a multitude of "wood" slats, trimming and adhering on a piece of acetate. I did this process twice, as I needed to create an actual bed for my big ripe strawberry. A metallic pen helped make tiny nails in the wood. The wooden wheels were tricky, as after die-cutting and trimming the card stock, the spokes were very thin, and I adhered them to acetate for stability.


The banner is printed on canvas with a printer, which required some experimentation. I wanted to incorporate the polka dots on the bowl of strawberries and did so here, fading them out in order for the sentiment to shine through. I then cut it out and tied it to the wagon with very thin strips of raffia.

The little farmer dog was my next task, and I knew it would be difficult because of the size. He's only a bit over an inch high, and I wanted to paper-piece him. I again drew a template and worked with very sharp scissors to cut the elements, some several times to pop out specific parts. Like the inspiration photo, the playful pup is decked out in a gingham neckerchief (created from ribbon) and his hat is made from raffia. I sponged his edges for a bit more depth.

Next up was the real "fruit" of my labors: the big, ripe strawberry. I drew a template for both the fruit and the green cap and then traced and cut each out several times. I sponged around the edges again and then added liquid pearl "seeds." I assembled the strawberry to open like a traditional card for a place to write a message.
I was finally ready to assemble my entire card, which I did so by creating a "hitch" between the tractor and wagon and then by tracing and cutting an acetate card base. This card stands, with or without the big strawberry, all on its own. When I was done, I heaved a big sigh of relief, with just a little wish that it were a big breath of fresh country air.
BEAN NOTES: Stampin' Up Soft Suede, Riding Hood Red, Wild Wasabi, and So Saffron Classic Die Ink; VersaMark Clear Ink; SU Riding Hood Red, Whisper White, Basic Black, and Soft Suede Card Stock; Essentials by Ellen Hutson Chipboard; Taylored Expression Textured Cardstock (greens); Papertrey Ink Summer Sunrise Card Stock; Clear Acetate (generic); Copic Sketch and Multiliner SP Markers; Spellbinders Classic Circle Nestabilities; SU Circle Punches and Punch Pack; Big Shot; Hole Punch (generic); Printable Canvas (generic); Dafont.com Nashville Font, Foam Tape HAPPY BEANS: PTI Woodgrain Impression Plate; Lemon Yellow Liquid Pearls; Hero Arts Sponge; SU Glassy Glaze Embossing Powder; Kate's Paperie Gingham Ribbon; Raffia


Tuesday, June 8, 2010

A Fond Farewell Hop!...(with Candy!)...

Welcome to the Pals June Blog Hop! This month, we're bidding a "Fond Farewell" to some of our old friends, the 30 retiring colors of Stampin' Up's Color Renovation.
If you've hopped over from the very cool Mike Funke's Stampin' Style, I'm stop #10 and I'm glad you hopped by. If you should "hop" off course, simply click on any of the links on the hop line-up below and you'll be back on track.
To give our colors a real send-off, we're offering BLOG CANDY at each and every stop. Visit all 17 blogs and leave a comment answering a specific question, and you'll have 17 chances to win some Stampin' Up goodies!


To view an image up-close, please click on the photo.

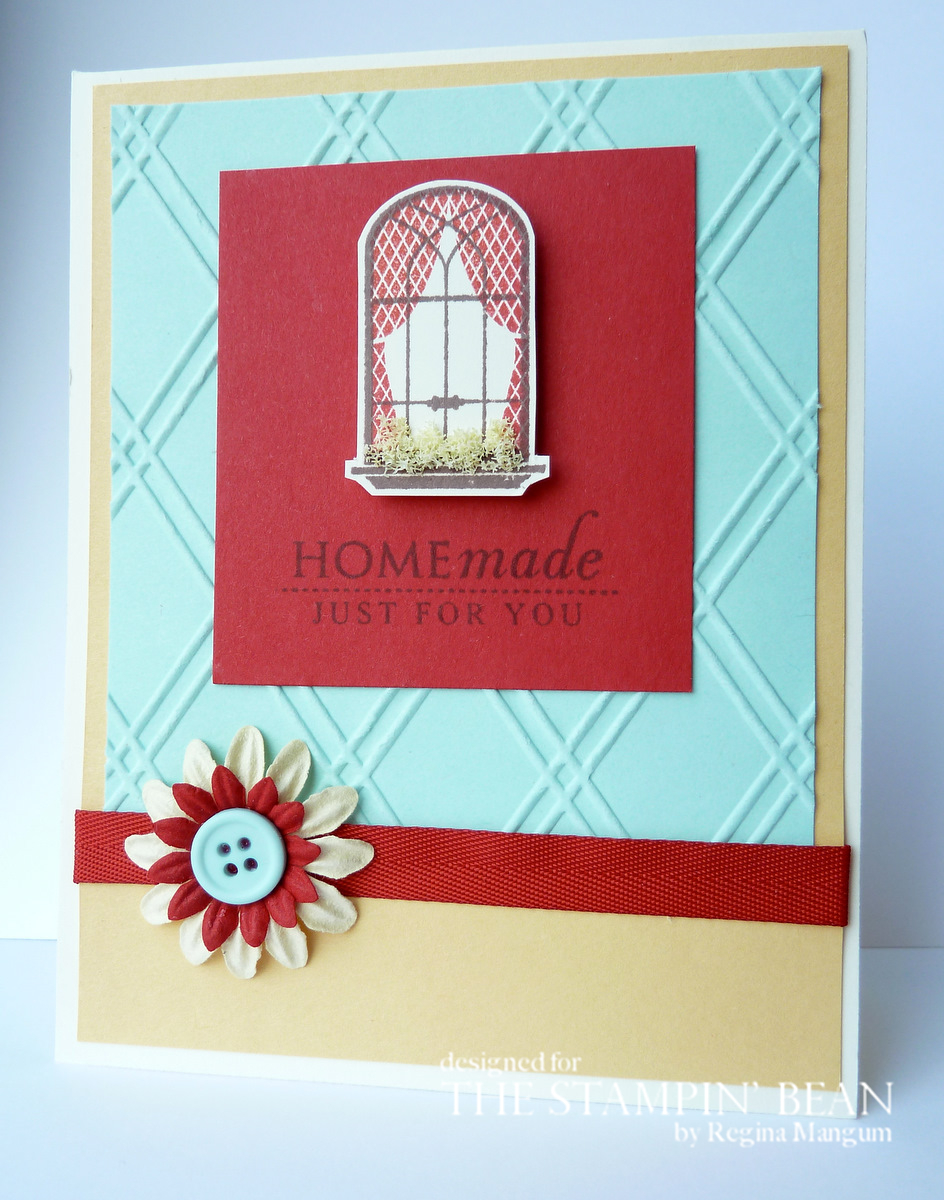
To bid proper goodbye to the Retiring Colors, I decided to see if I could make a card that used ALL of them. I didn't think I could do it, but I did manage to make this fun, bright card to pay homage to all the wonderful colors that have become almost like friends.
For this card, I used two punches, one from the new Punch Pack and the other a 1/2" Circle Punch. I simply punched every color twice and then assembled them onto a piece of white card stock. I used a 1-3/4" Circle Punch to cut a window through my colorful panel as well as my white card base and glued a piece of Basic Black to the inside of the card. For the sentiment, I brought out an old hostess stamp -- I thought the message a perfect fit to say not only au revoir, but also to look forward to some exciting new additions!
BEAN NOTES: (Unless otherwise noted, all materials are Stampin' Up) Best Yet Stamp; Basic Black Classic Dye Ink; Basic Black and Whisper White Card Stock; Punch Pack, 1-3/4" and 1/2" Circle Punches; Foam Dimensionals HAPPY BEANS: Pink Passion, Pixie Pink, Pale Plum, Orchid Opulence, Lovely Lilac, Lavender Lace, Almost Amethyst, Bordering Blue, Brocade Blue, Ballet Blue, Brilliant Blue, Taken with Teal, Glorious Green, Handsome Hunter, Sage Shadow, Mellow Moss, Green Galore, Gable Green, Barely Banana, Yoyo Yellow, Summer Sun, Apricot Appeal, Only Orange, Really Rust, Ruby Red, Cameo Coral, Blush Blossom, Creamy Caramel, Close to Cocoa, Going Gray Card Stock

**To order these or any other current Stampin' Up products, please email me HERE.

FOND FAREWELL HOP LINE-UP

3. Barbara Furlong www.theloveofstamping.com
5. Debbie Pierce www.stampinsunshine.com
6. Ann Schach www.stampinchic.com
7. Melanie Collins www.oopsadaisy.typepad.com
13. Mary Fish www.stampinpretty.com
14. Carla Bazhenow www.carlas-scraps.com
15. Joanna Munster www.inspiredbystampin.com
16. Margaret Moody www.margaretmoody.typepad.com
17. Martha Stewart www.SeasonsOfStamping.com

Now on to BLOG CANDY! For my giveaway, I'll be "Going Green" -- that is to say one lucky winner will receive a set of farewell color items in many shades of retiring greens. Should you be chosen, this is what you will receive:

*Handsome Hunter Classic Ink Pad AND Refill
*Glorious Green Classic Ink Pad AND Refill
*Taken With Teal Ink Pad AND Refill
*Green Galore Classic Ink Pad AND Refill
*Gable Green Classic Ink Pad AND Refill
*Mellow Moss Classic Ink Pad AND Refill
Also, your prize package will include two retired Hostess sets: Congrats and Cause for Celebration, both new and unmounted.
Plus: Your candy package will also include Stampin' Write Markers in the following shades (for a little splash of color!): Creamy Caramel, Dusty Durango, Handsome Hunter, Lovely Lilac, Yoyo Yellow, Only Orange, Gable Green, Ruby Red, Pixie Pink, Summer Sun, Bordering Blue, Brilliant Blue, Pink Passion

How's that for a fun prize pack? For your chance to win all of the above goodies, please leave me a comment at the end of this post answering my Hop Question by 3:00 PM CST, Friday, June 11th, at which time I'll choose a random winner. Please play nicely and only leave one comment per person. Sorry, but only U.S. residents are eligible to win, but feel free to leave a comment as we'd all love to hear from you!

Hop Question: What is your favorite retiring color from Stampin' Up? I'll go first: Sage Shadow
EDIT: COMMENTS TO QUALIFY FOR THE BLOG CANDY ARE NOW CLOSED. Please feel free to leave a comment just to let me know what you think, or to answer the Hop Question!

I'll announce the winner of my blog candy package here on my blog on Sunday, June 13th, 2010. The winner will have 48 hours to contact me after their name is announced. Good luck!

More inspiring ideas and another great blog candy package await you at Linda Callahan's lovely Stampin' Seasons, stop number 11 on the "Fond Farewell" Pals Hop. Hop on over there and see Linda's fantastically creative ideas. Thanks for "hopping" by!

Monday, February 22, 2010

Bloom Where You Are Planted...


To view an image up-close, please click on the photo.

The Friday Challenge: Beautiful Botanics is one I was drawn to because, well, who doesn't love flowers? I decided to be a little ambitious and create a scene to house my lovely blooms, in the form of a shuttered window with a flower box and awning. Let's see if I succeeded.
For this card, I first stamped my flower image from Plant a Little Love three times on plain white cardstock, using a mask to create the full image I wanted. This would serve as my base. Next, I stamped three times, separately, on Wild Wasabi and then again on Perfect Plum. Finally, I stamped six times on So Saffron. After coloring with Copics, I carefully cut out each image that I needed. I wanted a lot of depth, so I used dimensional dots to pop out certain blooms and buds.
I then cut out my shutters and cut frames for each, mitering the corners. My awning and flower box were made from textured cardstock and some fun border punches, and I adorned each with some pearls. My window was cut from a bit of textured paper and I adhered some clear acetate and vellum behind it to create "glass." With a Copic, I added some shadows behind the glass and then assembled the whole card.
I didn't think it wise to try to add a sentiment to the front of the card, so I decorated the inside in a similar fashion to the outside and attached the nice sentiment. I thought the card would be appropriate for a housewarming or for someone who has moved on to a new career, somewhere where I hope they can bloom!
BEAN NOTES: JustRite Plant a Little Love and Seeds of Kindness (sentiment) Stamps; Stampin' Up Wild Wasabi and Elegant Eggplant Classic Dye Ink; SU Designer Paper (name unknown); Papertrey Ink Kraft Cardstock, Vellum and Clear Acetate; Dark Plum Textured Cardstock (generic); Kate's Paperie White Text Sheet; SU Kiwi Kiss, Elegant Eggplant, Whisper White, So Saffron, and Perfect Plum Cardstock; Copic Sketch Markers; Martha Stewart Simple Scallop and SU Scalloped Border Punches; Paper Shapers 1-3/4" and 1-1/4" Circles Punches; Foam Dimensional Squares (generic); Kaiser White Pearls HAPPY BEANS: Hobby Knife; Craft Scissors

Thursday, November 19, 2009

Bobbing For Apples...


To view the image up-close, please click on the photo.

Margaret Moody has come up with another fabulous sketch for the Pals Paper Arts Challenge. I got out my square punch and punched out four apples from this darling Stampin' Up designer paper. For my background, I thought I'd make my own designer paper with the matching apple stamp. Using a marker, I colored in the little seeds on the punched apples for a little contrast. I thought the green apple could speak for itself, so I left the rest of the card clean and simple.
BEAN NOTES: (Unless otherwise noted, all materials are Stampin' Up) Tart & Tangy and Designer Label Punch Stamps; Real Red Classic Dye Ink; Summer Picnic Designer Series Paper; Old Olive, Basic Black, and Whisper White Cardstock; 1-1/8" and 1-1/4" Square Punches; Foam Dimensional Squares (generic) HAPPY BEANS: Stampin' Write Marker (Black)